We first shed light on how a customer can connect different endpoints to the Edge Network Fabric. The subsequent chapters discuss how the customer may then use and manage their network. The articles below are fairly technical and centered on the accompanying enfcli tool.
This how-to will walk through creating and updating a profile. Adding a WiFi Configuration and configuring a firmware update are covered in other how-to articles under the ** section.
enfcli needs to be installed. For help, see the
Getting Started TutorialDOMAIN_ADMIN accountenfcli
> enfcli --host <client-domain>.xaptum.io --user <admin@account>
Create a profile with an appropriate name.
> captive create-profile --device-mode=secure-host --profile-name=RFD-devices
Name                  : RFD-devices
Profile ID            : 70a82dd2-5a5a-40cb-9575-aaff5b7414dc
Configuration version : 1
Firmware Update ID    : < not configured >
Mode                  : secure-host
Wifi config           : < not configured >
Currently, only the secure-host mode is supported.
Profiles are not deleted or overwritten. When a change is made to a profile, the system automatically bumps the version up. This ensures that there is a history of all of the changes to a profile. Only the latest profile will be applied to devices.
If a WiFi Configuration or
Firmware Update Record already exists, you can
include either or both of those IDs in the create-profile command to save a
step.
> captive create-profile --device-mode=secure-host --profile-name=Scranton-devices --wifi-id=1aad6bdd-8b09-49bc-bd43-d5255d543c78
Name                  : Scranton-devices
Profile ID            : c61404e4-ddb0-4b73-9f80-0edfb77fe8b3
Configuration version : 1
Firmware Update ID    : < not configured >
Mode                  : secure-host
Wifi config           :
    id                : 1aad6bdd-8b09-49bc-bd43-d5255d543c78
    domain            : 2607:8f80:8080::/48
    name              : Demo
    config version    : 4
The Captive Server will query the IAM server to get a list of all provisioned devices. The details of the device will be populated automatically once it connects to the ENF.
To have the Captive Server apply the setting from a profile to a device, the device must be updated to use the profile.
Devices may be identified either by the serial number or the IPv6 address.
> captive list-devices
+-----------------+----------+--------------------------------------+-------------+-----------+---------------+
| Serial No       | Dev Name | Dev Addr                             | Router Mode | Connected | SSID          |
+-----------------+----------+--------------------------------------+-------------+-----------+---------------+
| XRW0441900A001  |          | 2607:8F80:8080:9:7B86:E00F:D00F:FADD | secure-host | true      | xaprc_default |
| XRW0441900A002  |          | 2607:8F80:8080:7:4B1A:C340:DDD2:F6DA | secure-host | true      | xaprc_default |
| XRW0441900B003  |          | 2607:8F80:8080:7:82C5:3E33:CC8E:1D84 | secure-host | false     |               |
+-----------------+----------+--------------------------------------+-------------+-----------+---------------+
We are going to be working with the first device in the list.
> captive get-device-status --device-id=XRW0441900A001
Serial Number        : XRW0441900A001
Router Mode          : secure-host
Uptime (in seconds)  : 7563.81
Status refresh time  : 2020-07-15T18:27:04Z
WIFI status          :
 connected        : true
 SSID             : xaprc_default
 IPv4 addresses   :
     IPv4         : 192.168.2.222
 IPv6 addresses   :
     IPv6         : fdc3:c108:dc6a:0:b2a6:f5ff:fe00:fbe
     IPv6         : fe80::b2a6:f5ff:fe00:fbe
WIFI configuration   :
 Name          :
 Wifi ID       :
Firmware Status      :
 image name       : < not available >
 operating state  : normal
> captive update-device --device-id=XRW0441900A001 --profile-id=d37a1806-3989-48fb-9742-6a4d22191dd9
Serial Number     : XRW0441900A001
Device Name       : demo-device-1
Device Address    : 2607:8F80:8080:9:7B86:E00F:D00F:FADD
Mac Address       : B0:A6:F5:00:10:A6
Firmware Version  : xaprw001-v1.0.9-0-gb5b1470
Hardware Model    : xaprw001
Profile           :
 Name                  : Chicago-North
 Profile ID            : d37a1806-3989-48fb-9742-6a4d22191dd9
 Configuration version : 1
 Firmware Update ID    : < not configured >
Status            :
 Router Mode   : secure-host
 wifi connected:  < unknown >
The Captive Server will schedule an update task to send the new configuration to the device. The update usually takes between 3 and 10 minutes, depending on how busy the Captive Server is.
The profile name, WiFi Configuration, and Firmware Update fields of a profile may be modified.
Updating the profile name:
> captive update-profile --profile-id=70a82dd2-5a5a-40cb-9575-aaff5b7414dc --profile-name=TEST-devices
Name                  : TEST-devices
Profile ID            : 70a82dd2-5a5a-40cb-9575-aaff5b7414dc
Configuration version : 2
Firmware Update ID    : < not configured >
Mode                  : secure-host
Wifi config           : < not configured >
This how-to describes setting up the WiFi credentials and configuration of the ENF Router Card. After a WiFi Configuration is created or updated, the profile must be updated to use the new WiFi Configuration.
The router card can only be configured via the enfcli and ENF. Since
there is no local, configuration page, it is nearly impossible for a malicious
actor to misconfigure the WiFi – even with physical access.
enfcli needs to be installed. For help, see the
Getting Started TutorialDOMAIN_ADMIN accountenfcli
> enfcli --host <client-domain>.xaptum.io --user <admin@account>
The WiFi configuration is created as a JSON file and uploaded via the enfcli.
Using your favorite text editor, create the WiFi configuration JSON file. For
this example, the file will be in ~/chicago-north.json
It should be in the format:
{
    "name" : "Chicago-North-Wifi",
    "description" : "Connects Chicago North Factory Floor",
    "networks" : [
        {   "name" : "Acme Mfg.",
            "SSID" : "AcmeHidden",
            "SSID_type" : "string",
            "auth" : {
                "type" : "psk",
                "passphrase" : "WileE.CoyoteGenius"
            },
            "IPv4" : {
				"type" : "dhcp"
			},
            "IPv6" : {
				"type" : "auto"
			}
        }
    ]
}
The JSON file informs the Captive Server how to create the configuration record that will be sent to the router-card. The JSON file must be uploaded via the enfcli.
> captive create-wifi-configuration --wifi-config-file=/home/jqpublic/chicago-north.json
Name          : Chicago-North-Wifi
Wifi ID       : 9e3f2a2e-e2ef-4152-8fa3-44b40ad1d258
WiFi Networks :
    Name          : Acme Mfg.
        SSID         : AcmeHidden
        SSID type    : string
        auth         : psk
        IPv4         : dhcp
        IPv6         : auto
To list the WiFi configurations:
> captive list-wifi-configurations
+--------------------------------------+--------------------+--------------+
| ID                                   | Wifi Name          | Config Vers. |
+--------------------------------------+--------------------+--------------+
| 9e3f2a2e-e2ef-4152-8fa3-44b40ad1d258 | Chicago-North-Wifi | 1            |
+--------------------------------------+--------------------+--------------+
Once the WiFi Configuration record is created, it must be assigned to a Profile in order for it to be applied to one or more devices.
This example uses the Profile that was created in the Router Card Profile example. To view that Profile, issue the following:
> captive get-profile --profile-id=70a82dd2-5a5a-40cb-9575-aaff5b7414dc
Name                  : TEST-devices
Profile ID            : 70a82dd2-5a5a-40cb-9575-aaff5b7414dc
Configuration version : 1
Firmware Update ID    : < not configured >
Mode                  : secure-host
Wifi config           : < not configured >
Now, update the profile using the new WiFi Configuration:
> captive update-profile --profile-id=70a82dd2-5a5a-40cb-9575-aaff5b7414dc --wifi-id=9e3f2a2e-e2ef-4152-8fa3-44b40ad1d258
Name                  : TEST-devices
Profile ID            : 70a82dd2-5a5a-40cb-9575-aaff5b7414dc
Configuration version : 2
Firmware Update ID    : < not configured >
Mode                  : secure-host
Wifi config           :
    id                : 9e3f2a2e-e2ef-4152-8fa3-44b40ad1d258
    domain            : 2607:8f80:8080::/48
    name              : Chicago-North-Wifi
    config version    : 1
As mentioned in the
Router Card Profile article,
an existing WiFi Configuration can be added to a profile in the
create-profile command.
The Captive Server manages firmware updates for the ENF Router Card. To accomodate customer scheduling needs, the Captive Server has flexible scheduling capabilities.
The Xaptum engineering team will make the new firmware release available to the ENF. At that point, the customer follows three steps to install the firmware.
Before applying any update, the Captive Server will check to ensure that the currently running firmware is older than the requested update.
enfcli needs to be installed. For help, see the
Getting Started TutorialDOMAIN_ADMIN accountenfcli
> enfcli --host <client-domain>.xaptum.io --user <admin@account>
The Captive Server scheduling is defined in a JSON file and is similar to a
Unix cron schedule. The user defines the year, month, day of the month,
hour, minute, and day of the week for the schedule to become active. The
installation schedule has two additional fields: the domain and a description.
Schedules only apply to a single domain – if the same timing is desired for a
different domain, you must create a new schedule. Note that in the installation
schedule, the domain field may refer to a /48 domain or a /64 network.
{
 "name" : "Weekend_update",
 "domain" : "2607:8F80:8080:0009::/64",
 "times" : [
     {
         "minute" : "*",
         "hour" : "23,0-2",
         "day_of_month" : "*",
         "month" : "*",
         "year" : "*",
         "day_of_week" : "0"
     },
     {
         "minute" : "*",
         "hour" : "23",
         "day_of_month" : "*",
         "month" : "*",
         "year" : "*",
         "day_of_week" : "6"
     },
     {
         "minute" : "*",
         "hour" : "0-2",
         "day_of_month" : "*",
         "month" : "*",
         "year" : "*",
         "day_of_week" : "1"
     }
 ]
}
The schedule JSON is an object with three elements:
The times objects contain the following string elements:
The example above schedules an update on domain 2607:8F80:8080:0009::/64 for Saturday and Sunday nights from 1 1PM until 2 AM.
> captive create-schedule --schedule=/Users/jqpublic/schedule-weekend.json
Schedule Name    : Weekend_update
Shedule ID       : dc8a7576-51c9-4854-ac12-cac13024d836
domain           : 2607:8f80:8080:9::/64
Times:
+------+------+-------+------+---------+--------+--------+--------------------------------------+
| Name | year | Month | Date | Weekday | Hour   | Minute | id                                   |
+------+------+-------+------+---------+--------+--------+--------------------------------------+
|      | *    | *     | *    | 0       | 23,0-2 | *      | 55da6480-a0e0-4f4a-9057-dd9ee516c343 |
|      | *    | *     | *    | 6       | 23     | *      | 6e94a908-aa00-4cda-99ee-4a1e49a445be |
|      | *    | *     | *    | 1       | 0-2    | *      | 0ebf132e-a65b-4028-828f-c03c379f5ad6 |
+------+------+-------+------+---------+--------+--------+--------------------------------------+
> captive list-schedules
+----------------+--------------------------------------+
| Name           | ID                                   |
+----------------+--------------------------------------+
| Weekend_update | dc8a7576-51c9-4854-ac12-cac13024d836 |
+----------------+--------------------------------------+
> captive get-schedule --schedule-id=dc8a7576-51c9-4854-ac12-cac13024d836
Schedule Name    : Weekend_update
Shedule ID       : dc8a7576-51c9-4854-ac12-cac13024d836
domain           : 2607:8f80:8080:9::/64
Times:
+------+------+-------+------+---------+--------+--------+--------------------------------------+
| Name | year | Month | Date | Weekday | Hour   | Minute | id                                   |
+------+------+-------+------+---------+--------+--------+--------------------------------------+
|      | *    | *     | *    | 0       | 23,0-2 | *      | 55da6480-a0e0-4f4a-9057-dd9ee516c343 |
|      | *    | *     | *    | 6       | 23     | *      | 6e94a908-aa00-4cda-99ee-4a1e49a445be |
|      | *    | *     | *    | 1       | 0-2    | *      | 0ebf132e-a65b-4028-828f-c03c379f5ad6 |
+------+------+-------+------+---------+--------+--------+--------------------------------------+
The firmware update task associates a firmware version. It also provides for selecting the percentage of devices to update. For example, it is possible to upgrade only 10% of the devices to firmware version 1.2.0, using the schedule listed above.
The update task is created as a JSON file and then uploaded to the captive
server via enfcli.
> captive list-firmware-images
+------------------+
| Firmware Version |
+------------------+
| 1.0.13           |
| 1.0.14           |
| 1.1.1            |
| 1.2.0            |
+------------------+
> captive get-firmware-info --version=1.2.0
Release version: 1.2.0
+-------------------------------------------------------+----------------+-------------+----------------------------------------------+
| Image Name                                            | Hardware Model | Update Type | SHA256                                       |
+-------------------------------------------------------+----------------+-------------+----------------------------------------------+
| artifact-signed-xaprw001_dev-v1.2.0-0-g25a335e.mender | xaprw001_dev   | update      | 47DEQpj8HBSa+/TImW+5JCeuQeRkm5NMpJWZG3hSuFU= |
+-------------------------------------------------------+----------------+-------------+----------------------------------------------+
1 rows in set
{
 "version" : "1.2.0",
 "schedule_id" : "dc8a7576-51c9-4854-ac12-cac13024d836",
 "update_percentage" : 10
}
> captive create-firmware-update --update=/Users/jqpublic/update-test.json
Update Task ID               : 84d2cc7f-ce3c-40f7-8694-ce74e80dc2c2
Schedule ID                  : dc8a7576-51c9-4854-ac12-cac13024d836
Firmware Version             : 1.2.0
Percent of devices to update : 10.0
Once an updat task has been created, it must be applied to one or more profiles. Without this step, the task is not associated with any devices and the Captive Server will not act on it.
Add update task to an existing profile.
> captive update-profile --profile-id=70a82dd2-5a5a-40cb-9575-aaff5b7414dc --update-id=84d2cc7f-ce3c-40f7-8694-ce74e80dc2c2
Name                  : TEST-devices
Profile ID            : 70a82dd2-5a5a-40cb-9575-aaff5b7414dc
Configuration version : 3
Firmware Update ID    : 84d2cc7f-ce3c-40f7-8694-ce74e80dc2c2
    Update version    : 1.2.0
Mode                  : secure-host
Wifi config           :
    id                : 9e3f2a2e-e2ef-4152-8fa3-44b40ad1d258
    domain            : 2607:8f80:8080::/48
    name              : Chicago-North-Wifi
    config version    : 1
As mentioned in the
Router Card Profile article,
an existing update task can be added to a profile in the
create-profile command.
In the example, we updated 10% of the devices to version 1.2.0. Once these are
complete and have proven reliable, we might want to update 50% of the devices.
Modify the JSON file to have "update_percentage" : 50. This update
percentage is cumulative. In this example, we’re updating an additional 40%
of the devices – 50% in total.
> captive modify-firmware-update --update-id=84d2cc7f-ce3c-40f7-8694-ce74e80dc2c2 --update=/Users/jqpublic/update-test.json
Update Task ID               : 84d2cc7f-ce3c-40f7-8694-ce74e80dc2c2
Schedule ID                  : dc8a7576-51c9-4854-ac12-cac13024d836
Firmware Version             : 1.2.0
Percent of devices to update : 50.0
Since, in this example, the update task has already been added to an active profile, it is not neccessary to add it again.
The ENF Router Cards are shipped without a default password but with a default network. To allow the device to connect to the ENF, the customer must configure the new card by setting up a temporary configuration network. This network can be in a DMZ - completely outside of the corporate network - as long as it can reach the global internet. Because ENF traffic is always encrypted and the ENF and the device are both authenticated, the use of a default network does not diminish security.
The default network must be configured as follows:
SSID: xaprc_default
Password: password123!
As mentioned above, the network must have internet access.
Once the default network is set up, the device will connec to the ENF. This may take a few minutes but may be sped up by performing a reboot.
To verify that the device has connected, login to the Xaptum Control Panel
webpage. For most cases,this will be similar to: https://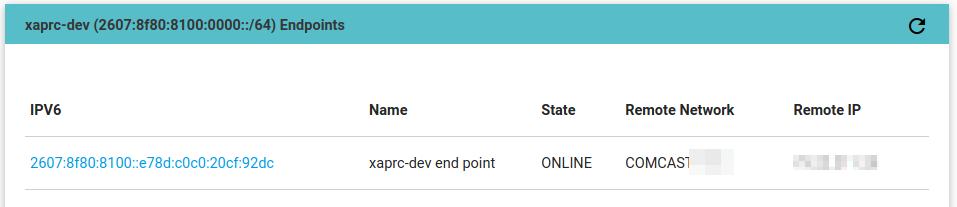
Follow the instructions in the Router Card Profile to create a profile
Using the Router Card WiFi Configuration article as a guide, create and apply a WiFi configuration to the profile.
If needed, create a firmware update schedule and an update task per the Updating Router Card Firmware article.
Apply the new profile to the device as described in the Router Card Profile article.
Once all of the devices have been updated to the desired configuration, it is
safe to disable the xaprc_default network.
Every ENF Router Card comes with the HSS feature, allowing it to handle encryption while directing the encrypted traffic back into the gateway for transmission through another network device (Ethernet, LTE, ect).
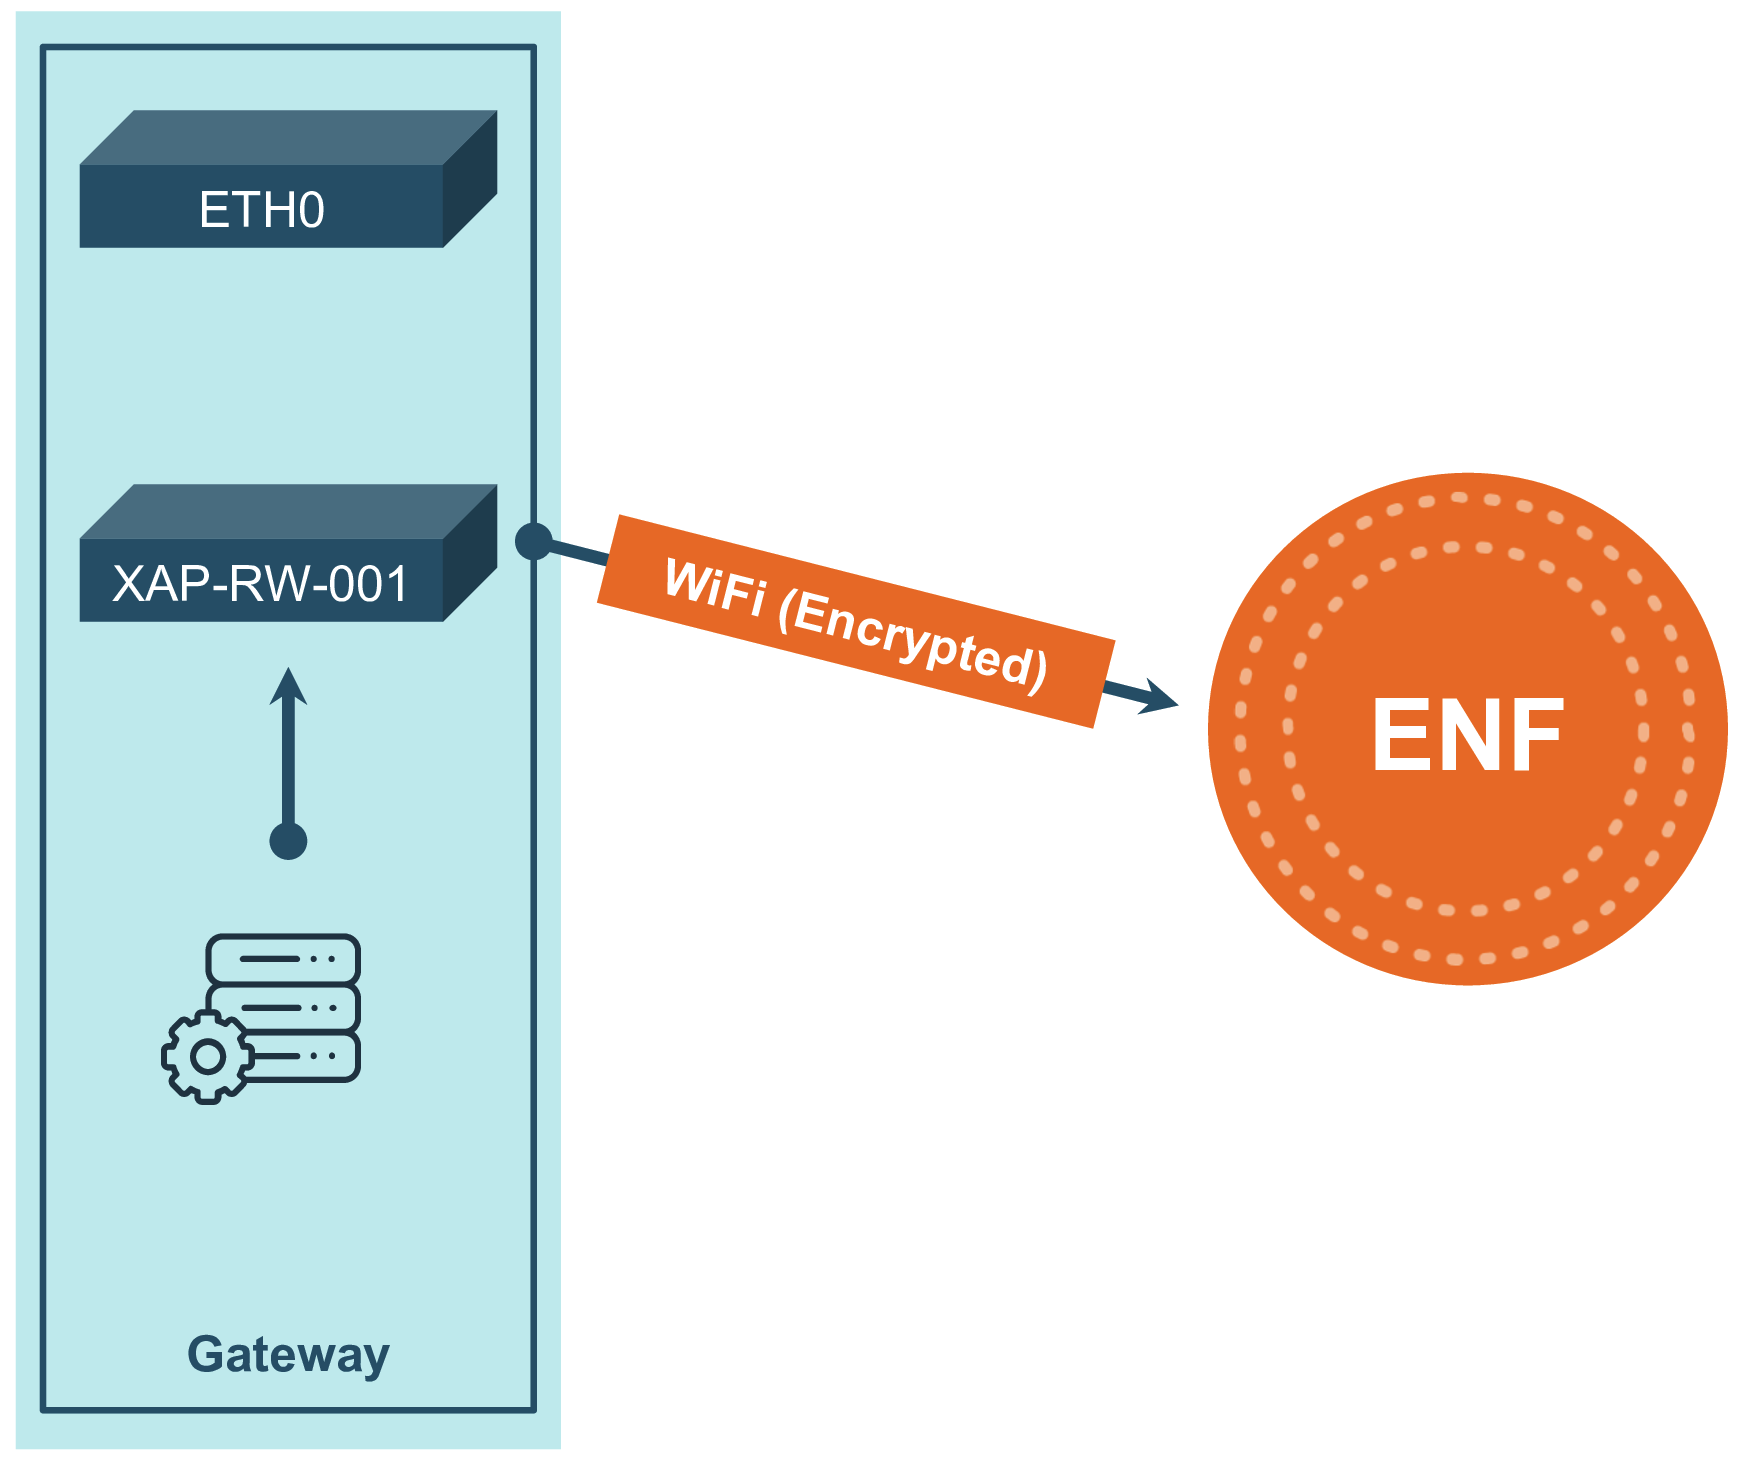 | 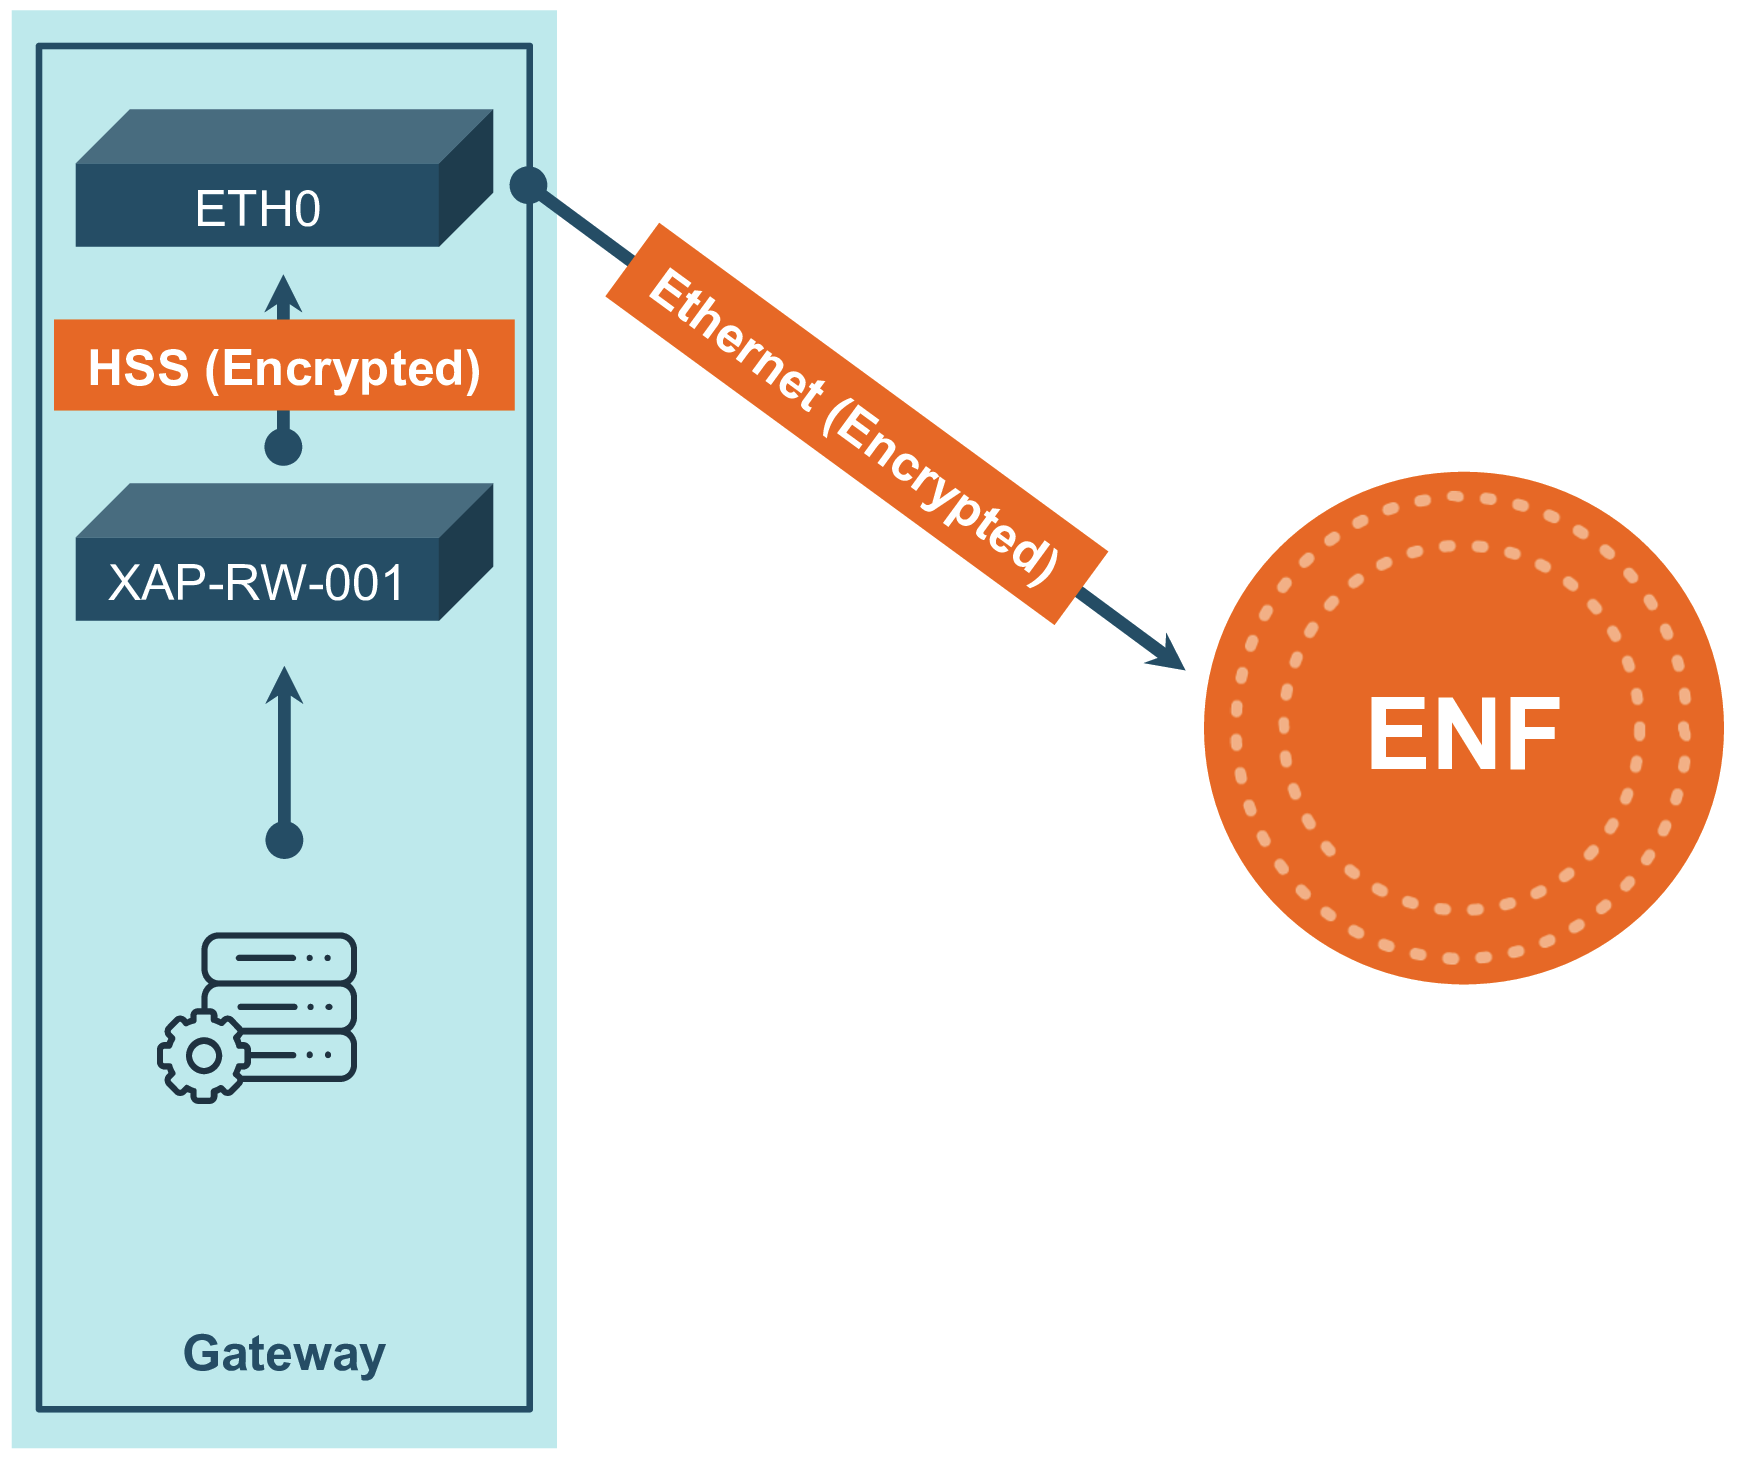 |
| Figure 1: Data flow with WiFi | Figure 2: Data flow with HSS |
HSS requires the host to install a custom driver described in the section below. Once installed, this driver will automatically detect when the router card wants to direct traffic back into the host. The TCP traffic will follow all routing/iptables rules once directed back into the host.
Note: By default the router card will always connect over WiFi, and failing that will try HSS. There is currently no configuration to have the router card ignore a functional WiFi connection.
HSS requires a custom driver to be built and loaded. The preferred install method is using DKMS. Otherwise, the driver would have to be manually rebuilt every time the kernel is updated.
Xaptum maintains a Debian package for the HSS driver. Use the following steps to install it.
apt-key adv --keyserver keyserver.ubuntu.com --recv-keys c615bfaa7fe1b4ca
echo "deb http://dl.bintray.com/xaptum/deb <dist> main" | sudo tee /etc/apt/sources.list.d/xaptum.list
sudo apt-get update
Replace <dist> with your Debian distrobuation (Stretch, Buster, ect)
sudo apt-get install xaptum-hss-host
Systems that do not run Debian can still benefit from the management features that DKMS provides. DKMS will ensure that HSS is recompiled with new kernels and that future updates can be managed.
git clone [email protected]:xaptum/hss.git
cd hss/host
sudo ./dkms-install
If neither our APT repos or DKMS are available the module can be independently built and managed.
Note: Required packages: kernel-devel, git, build-essential, kernel-headers-$(uname -r), sudo
git clone [email protected]:xaptum/hss.git
cd hss/host/src
make
sudo make install
Routing IPv6 traffic works the same as a non-HSS setup. However,
considerations will also have to be made to allow IPv4 traffic to be
routed through the secondary network device. The router card will send
IPv4 traffic to the ENF servers at 23.147.128.112:443.
This tutorial shows how to set up a Docker Container as an ENF endpoint. It follows the README file from the xaptum/enf-services github repository.
We will use the xaptum/enftun Docker
Container published on Docker Hub.
This container was created from the enftun dirctory of the enf-services
repository on GitHub for more
flexibility. For more flexibility in configuring the container, clone the
repository.
This tutorial was created on a Linux device and makes some assumptions based on the environment. Installation on a Mac should be nearly identical. Using a Windows machine has not been attempted, but should be possible without much modification since all of the tools are available.
2607:8f80:8080:b::/64jqpublicThe following tools will need to be installed prior to running through the tutorial:
Docker images for the ENF require IPv6 support, which is not enabled by default in most Docker installations. To enable it, add the following options to the Docker daemon configuration file daemon.json.
"ipv6" : true"fixed-cidr-v6" : "fd00:d0c::/64"and restart the Docker daemon.
On Linux, daemon.json is located at /etc/docker/daemon.json.
On Mac OS, change it via the Docker Preferences->Daemon->Advanced menu.
The fixed-cidr-v6 option is required due to a
bug in Docker. The
fd00:d0c::/64 prefix is arbitary. Replace it as desired.
In order to securely communicate, the docker containers and the ENF must share a set of public/private keys. The ENF must also know the address to assign to the endpoints. This task is accomplished via the enfcli.
cd into it.
> mkdir -p ~/enf-docker-container/enf0
> cd ~/enf-docker-container/enf0
network administrator.> enfcli --host demo.xaptum.io --user [email protected]
Connecting to 'https://demo.xaptum.io'.....
Enter Password:
> iam create-endpoint-key --key-out-file=enf0.key.pem --public-key-out-file=enf0.pub.pem
Created enf0.key.pem
Created enf0.pub.pem
> iam create-endpoint-with-address --address=2607:8f80:8080:b::deb:2 --public-key-in-file=enf0.pub.pem
Created new ipv6 endpoint 2607:8f80:8080:b::deb:3
> iam create-endpoint-cert --cert-out-file=enf0.crt.pem --identity=2607:8f80:8080:b::deb:2 --key-in-file=enf0.key.pem
Created /home/jqpublic/server-keys/enf0.crt.pem
enfcli
> exit
2607:8f80:8080:b::/64
> docker pull xaptum/enftun
> cd ~/enf-docker-container/
 > docker run                                        \
     --cap-add=NET_ADMIN                             \
     --device /dev/net/tun:/dev/net/tun              \
     --sysctl net.ipv6.conf.all.disable_ipv6=0       \
     --sysctl net.ipv6.conf.default.disable_ipv6=0   \
     --volume `pwd`/enf0:/data/enf0:ro               \
     -it xaptum/enftun:latest bash
The Docker container will run as an interactive shell.
2607:8f80:8080:b::/64
To stop the client, simply log out of the interactive shell:
> exit
The following steps were created with a Vagrant virtual machine.
The steps for setting up a server are very similar.
If desired, update the Vagrantfile to use your favorite debian flavor.
This guide was written using bento/debian-9.11
vagrant upENFCLIIf using vagrant, create the files in the same directory where Vagrantfile resides.
enfcli --host https://demo.xaptum.io --user xap@demoiam create-endpoint-key --key-out-file=enf0.key.pem --public-key-out-file=enf0.pubkey.pemiam create-endpoint-with-address --address=2607:8f80:8080:9::2 --public-key-in-file=enf0.pubkey.pem
The chosen IP address must be in the desired /64 network.
In this case, the network is one of Xaptum’s demo networks.
iam create-endpoint-cert --cert-out-file=enf0.crt.pem --identity=2607:8f80:8080:9::2 --key-in-file=enf0.key.pemexitvagrant VM should be running.
vagrant rsync
/vagrant/ on the VMConnect to the VM or log into the server.
vagrant ssh
To install the ENFTUN, follow the directions in the ENFTUN README file in: https://github.com/xaptum/enftun/blob/master/README.md , but don’t start it yet.
systemd. It isn’t necessary to
configure systemd to start enf0 at boot.sudo cp /usr/share/doc/enftun/example/server.conf /etc/enftun/enf0.confsudo vi /etc/enftun/enf0.conf
hosts = and remove the IPv6 addresssudo mkdir -p /etc/enftun/enf0sudo cp /vagrant/enf0.crt.pem /etc/enftun/enf0sudo cp /vagrant/enf0.key.pem /etc/enftun/enf0sudo systemctl start enftun@enf0At this point, you should be able to ping a machine on the same ENF subnet.
ping 2607:8f80:8080:9::1
PING 2607:8f80:8080:9::1(2607:8f80:8080:9::1) 56 data bytes
64 bytes from 2607:8f80:8080:9::1: icmp_seq=1 ttl=58 time=33.7 ms
64 bytes from 2607:8f80:8080:9::1: icmp_seq=2 ttl=58 time=28.7 ms
64 bytes from 2607:8f80:8080:9::1: icmp_seq=3 ttl=58 time=31.5 ms
...
This guide walks through setting up a physical, Linux server to connect to the ENF.
The guide was created on an Ubuntu 18.04 (Bionic Beaver) machine, but should be
compatible with most Debian-based distribution.
NOTE: As of June 2020, this guide will not work on Ubuntu 20.04 (Focal Fossa)
Source code and detailed instructions are available in the Xaptum enftun repository on github.
> sudo apt install dirmngr
> sudo apt-key adv --keyserver keyserver.ubuntu.com --recv-keys c615bfaa7fe1b4ca
bionic. Replace this with the appropriate distribution name.> echo "deb http://dl.bintray.com/xaptum/deb bionic main" | sudo tee /etc/apt/sources.list.d/xaptum.list
> sudo apt update
enftun library.
> sudo apt install enftun
The enftun package includes sample systemd unit files. We will use the
server sample as our example.
server.conf file into /etc
> sudo cp /usr/share/doc/enftun/example/server.conf /etc/enftun/enf0.conf
We will start the enf services after generating the keys.
Each machine is one endpoint on the ENF and is identified by its IPv6
address. Each endpoint needs its own credentials.
The enftun-keygen utility helps in creating the credentials. The utility was
installed with the enftun package.
> sudo mkdir -p /etc/enftun/enf0
> sudo enftun-keygen -c /etc/enftun/enf0.conf       \
                  -u [email protected] \
                  -a 2607:8f80:8080:b::deb:c002
> sudo systemctl enable enftun@enf0
enf0 manually.
This avoids having to reboot.
> sudo systemctl start enftun@enf0
ENF.ONLINE on the ENF
dashboard.
2607:8f80:8080:b::/64Direct Anonymous Attestation (DAA) allows the ENF to remotely authenticate a device as a trusted computer. DAA is made possible by the TPM, which supports and stores the secure DAA credentials. This Concepts article delineates how Xaptum’s Zero Touch Provisioning allows the ENF to seamlessly and securely provision new devices. This guide describes how to manage and provision devices that use the XTT protocol.
enfcli needs to be installed. For help, see the
Getting Started Tutorial.DOMAIN_ADMIN account.enfcli
> enfcli --host <client-domain>.xaptum.io --user <admin@account>
When devices are provisioned, they are assigned to a /64 network. If needed, create a new /64 network following the instructions in the How To Create a New Network article for guidance.
The default network is the network to which a device will be assigned during the initial handshake. Once the device is assigned an IPv6 address, its identity and network cannot change.
The group ID can be entered directly into the enfcli command, or, with the aid of a barcode reader, can be scanned from the label provided when the router cards were shipped.
> iam list-groups
+-----------+-----------+-------------+-----------+-----------------+--------+
| DAA Group | Base Name | Provisioned | Onboarded | Default Network | Domain |
+-----------+-----------+-------------+-----------+-----------------+--------+
+-----------+-----------+-------------+-----------+-----------------+--------+
0 rows in set
> network list-networks
+----------+-----------------------+-------------------------+--------+
| Name     | Cidr                  | Description             | Status |
+----------+-----------------------+-------------------------+--------+
| scranton | fd00:8f80:81c0::/64   | Scranton, PA office     | ACTIVE |
| akron    | fd00:8f80:81c0:1::/64 | Akron, OH branch office | ACTIVE |
+----------+-----------------------+-------------------------+--------+
Assign Default Network
This can be accomplished by either:
> iam set-group-default-network --network=fd00:8f80:81c0::/64 --gid=8D5131E49A2BE9CA639035E3A2B9BACBDC003A328D0E3BBFB300D605E975BCFB
Set fd00:8f80:81c0::/64 as default network for group 8D5131E49A2BE9CA639035E3A2B9BACBDC003A328D0E3BBFB300D605E975BCFB
> iam set-group-default-network --network=fd00:8f80:81c0:1::/64
Scan DAA group information:
Scan the barcode.
Set fd00:8f80:81c0:1::/64 as default network for group 8D5131E49A2BE9CA639035E3A2B9BACBDC003A328D0E3BBFB300D605E975BCFB
> iam list-groups
+------------------------------------------------------------------+----------------------------------+-------------+-----------+---------------------+---------------------+
| DAA Group                                                        | Base Name                        | Provisioned | Onboarded | Default Network     | Domain              |
+------------------------------------------------------------------+----------------------------------+-------------+-----------+---------------------+---------------------+
| 8D5131E49A2BE9CA639035E3A2B9BACBDC003A328D0E3BBFB300D605E975BCFB | 58415054554D424153454E414D453031 | 50          | 0         | fd00:8f80:81c0::/64 | fd00:8f80:81c0::/48 |
+------------------------------------------------------------------+----------------------------------+-------------+-----------+---------------------+---------------------+
1 rows in set
At any time, a domain administrator may change the default network by following the steps outlined above and selecting a different network. This will have the following effect:
Acme Widget company manufactures 1000 IoT-Widgets in a single group. They initially deploy 700 IoT-Widgets to the scranton network and leave 300 on the warehouse shelves. The Acme Domain administrator takes the following steps:
The selected 700 devices (which were chosen at random) will boot up, perform an XTT handshake with the ENF, and receive their identities (IPv6 addresses) from the ENF.
A few months later, Acme Widget wants to deploy the remaining IoT-Widgets in the akron network. The domain administrator proceeds as follows:
The newly activated devices will boot and be assigned identities on the akron network.
The end result is that there are 700 devices running on the scranton network and 300 running on the akron network.
Servers, whether on-prem, in the cloud, or virtual, are usually set up one at a time – either manually or via an orchestration tool such as Ansible or AWS Certificate manager. Equipped with Zero Touch Provisioning, the ENF supports these flows by allowing you to specify the access credentials (i.e., public key) for each server.
Each endpoint, whether a device or server, on the ENF is identified by a persistent IPv6 address . A public/private key pair is also created for each server. The public key is uploaded to the ENF as the authentication credential for the server. The private key remains on the server. Servers use self-signed X.509 certificates to authenticate to the ENF. The certificate is signed by the key pair and kept with the server. When connecting, the server uses the certificate and private key for authentication.
This guide walks through the tools used to create a server identity and manage its access credentials.
enfcli needs to be installed. For help, see the
Getting Started Tutorial.NETWORK_ADMIN or DOMAIN_ADMIN account.enfcli
> enfcli --host <client-domain>.xaptum.io --user <admin@account>
The three main steps to provisioning a server on the ENF are:
The enftun-keygen tool, described in how-to guides for connecting
Docker containers,
virtual machines, and
physical servers
combines these steps for an easy way to manually provision a server. It’s a
great choice for manually provisioning a server, but it may not be well-suited
for automated deployments. Some organizations have their own key-generation
methods and will not use the Xaptum key generation tools.
This guide describes how to use the enfcli IAM commands to accomplish these same steps individually. These methods can be easily integrated into an existing workflow for managing server certificates and credentials.
This sequence is written for manual execution, but may be easily modified for automation.
This tutorial will generate the keys in ~/enf0-keys and copy them into the
correct location after creating the certificate. You can follow this example or
generate the keys in a location appropriate for your internal procedures and
policies.
Create a new key pair in the local directory.
> iam create-endpoint-key --key-out-file=enf0.key.pem --public-key-out-file=enf0.pubkey.pem
Created enf0.key.pem
Created enf0.pubkey.pem
The common name (CN) in the certificate must be the identity (IPv6 address) of
the server. If you haven’t already, pick an address for the server. The iam
create-endpoint-cert command will create and sign the certificate.
> iam create-endpoint-cert --cert-out-file=enf0.crt.pem --identity=2607:8f80:8080:b::deb:c004 --key-in-file=enf0.key.pem
Created /home/jqpublic/enf0-keys/enf0.crt.pem
The next step is to create the new identity in the ENF and associate the newly
generated certificate. The iam create-endpoint-from-cert command uses the
information stored in the certificate to accomplish both of these tasks.
If you are just updating the certificate for an existing server, skip ahead to
the Updating Endpoint Certificates section.
> iam create-endpoint-from-cert --cert-in-file=enf0.crt.pem
Created new ipv6 endpoint 2607:8f80:8080:b::deb:c005
The newly created identity will be visible in the xaptum.io dashboard.
For the server to connect to the ENF, the private key and the generated certificate must be placed in /etc/enftun/enf0
Create the /etc/enftun/enf0 directory if it does not exist.
$ sudo mkdir -p /etc/enftun/enf0
Copy the private key and certificate
$ sudo cp ~/enf0-keys/enf0.key.pem /etc/enftun/enf0
$ sudo cp ~/enf0-keys/enf0.crt.pem /etc/enftun/enf0
From time to time, it is necessary to update endpoint certificates. By default, the certificates created by the Xaptum tools expire one year from creation. Also, rotating passwords and renewing certificates is a security best-practice.
The following commands are executed from enfcli.
Generate a new key pair and certificate as described above. Be sure to use the same identity (IPv6 address).
Install the private key and certificate as described above.
> iam update-endpoint-cert --cert-in-file=enf0.crt.pem
Updated 2607:8f80:8080:b::deb:c004 credentials!
Each Xaptum customer is alotted a single /48 domain (The first 48 bits of the domain address are set by Xaptum). From this domain, the customer is free to create up to 65,535 seperate /64 networks. This allows the customer to follow networking best-practices by creating networks as small as functionally feasible – if two devices never need to communicate, isolate them.
enfcli needs to be installed. For help, see the
Getting Started Tutorialenfcli and login with an account that has the domain administrator
role.
> enfcli --host test.xaptum.io --user <[email protected]>
> network list-networks
+----------------------------+-----------------------+-----------------------------+--------+
| Name                       | Cidr                  | Description                 | Status |
+----------------------------+-----------------------+-----------------------------+--------+
| BACnet Demo                | 2607:8f80:8080:7::/64 | Office BACnet Demo Network  | ACTIVE |
| Testing Demo               | 2607:8f80:8080:a::/64 |                             | ACTIVE |
| scranton                   | 2607:8f80:8080:b::/64 | Scranton, PA office         | ACTIVE |
| Demonstration Network      | 2607:8f80:8080:c::/64 | Network for Demos           | ACTIVE |
+----------------------------+-----------------------+-----------------------------+--------+
> network provision-network --name=Rockford floor --description=Rockford factory floor
Provisioned a network!
+----------------+-----------------------+------------------------+--------+
| Name           | Cidr                  | Description            | Status |
+----------------+-----------------------+------------------------+--------+
| Rockford floor | 2607:8f80:8080:e::/64 | Rockford factory floor | ACTIVE |
+----------------+-----------------------+------------------------+--------+
1 rows in set
By default, the ENF firewall blocks all network traffic. The firewall must be configured to allow any required traffic. It is network security best-practice to configure the firewall to be as strict as possible.
Configuring the ENF firewall should be familar to anyone experienced with network firewalls boxes or AWS network ACLs. The rules specify the source and destintation addresses (subnet or specific IP), transport protocol (TCP, UDP, or ICMP), and source and destination ports for allowed traffic. The firewall is stateless, so you must configure separate rules for inbound (ingress) and outbound (egress) traffic.
enfcli needs to be installed. For help, see the
Getting Started TutorialFor this example, we will create rules that allow any device in a \64 subnet to
communicate with a server and the server to respond to the requests. The
server in the example is running on port 8080. Note that in this
configuration, devices cannot directly communicate with each other
enfcli and login with an account that has the domain administrator
role.
> enfcli --host test.xaptum.io --user <[email protected]>
> firewall add-firewall-rule --action=ACCEPT --direction=EGRESS --network=<enf /64 network> --protocol=TCP --priority=200 --source-ip=<enf /64 network> --dest-ip=<server enf address> --dest-port=8080
This allows outbound traffic from the devices to port 8080 of the server, but, at this point, the firewall blocks the server from receiving any messages.
> firewall add-firewall-rule --action=ACCEPT --direction=INGRESS --network=<enf /64 network> --protocol=TCP --priority=200 --source-ip=<enf /64 network> --dest-ip=<server enf address> --dest-port=8080
Now the firewall allows the server to receive messages, but only from the
designated /64 subnet.
> firewall add-firewall-rule --action=ACCEPT --direction=EGRESS --network=<enf /64 network> --protocol=TCP --priority=200 --dest-ip=<enf /64 network> --source-ip=<server enf address> --source-port=8080
The firewall is now configured to allow a response from the server, on port 8080, to the subnet. As above, the firewall does not yet allow the subnet devices to receive communication from the server.
> firewall add-firewall-rule --action=ACCEPT --direction=INGRESS --network=<enf /64 network> --protocol=TCP --priority=200 --dest-ip=<enf /64 network> --source-ip=<server enf address> --source-port=8080
Addressing ENF endpoints by IPv6 addresses can become tedious and error-prone
as the network grows. Even with a handful of machines, using, memorizing, and
entering sequences of numbers can be confusing. To minimize the necessity to
use IPv6 addresses, the ENF provides a DNS (Domain Name Server) feature. It is
much easier to remember punchpress1.scranton.prod than
2607:8f80:8080:b:bd32:eeb9:2085:b8cb.
The three main concepts to manage when dealing with the ENF DNS are as follows:
example.com or
internal.scranton.prod. The ENF DNS system is private to your account, so
there are no restrictions on the zones you can use.AAAA record for
punchpress1 in the internal.scranton.prod zone associates the hostname
punchpress.internal.scranton.prod to its IPv6 address.The first step in provisioning DNS services for your network is to define a DNS zone. The domain name of a zone sets the suffix shared by all DNS records in that zone. For example, in a zone named “foo.bar” we might have records “one.foo.bar” and “two.foo.bar” and “client.foo.bar” and “server.foo.bar”, etc.
The name of your zone can be anything you like, because it’s private to your
network. For this example, we’ll use the name scranton.prod.
A DOMAIN_ADMIN user can create a privileged DNS Zone that can have multiple networks associated with it. A NETWORK_ADMIN user can use a privileged zone, but cannot modify it – only a DOMAIN_ADMIN can create, modify, or delete a privileged zone.
A non-privileged DNS Zone only has a single network associated with it and may be created by either a NETWORK_ADMIN or a DOMAIN_ADMIN.
The Acme Widget company has IIoT devices at three different location: Rockford, Cleveland, and Paducah. The IT department created a separate network for each factory floor but wants a unified set of names for all of the factory machines. To accomplish this, IT creates a privileged DNS Zone and adds each of the three networks to it.
All commands must be issued by a DOMAIN_ADMIN account.
> dns create-zone --zone-domain-name=factory.prod --description=Factory Floor Machines
Created DNS zone factory.prod!
+--------------------------------------+--------------+------------------------+------------+---------------------+
| Id                                   | Zone         | Description            | Privileged | Enf Domain          |
+--------------------------------------+--------------+------------------------+------------+---------------------+
| a36de128-74ca-4673-bd29-e9db509f4368 | factory.prod | Factory Floor Machines | true       | 2607:8f80:8080::/48 |
+--------------------------------------+--------------+------------------------+------------+---------------------+
1 rows in set
dns add-networks-to-zone --networks=2607:8f80:8080:b::/64,2607:8f80:8080:c::/64 --zone-id=a36de128-74ca-4673-bd29-e9db509f4368
Added the following networks to zone with id: a36de128-74ca-4673-bd29-e9db509f4368
+----+-----------------------+
| Id | Network               |
+----+-----------------------+
| 73 | 2607:8f80:8080:c::/64 |
| 74 | 2607:8f80:8080:b::/64 |
+----+-----------------------+
2 rows in set
The command for removing networks from a zone is analogous to adding them:
> dns delete-networks-from-zone --networks=2607:8f80:8080:b::/64,2607:8f80:8080:c::/64 --zone-id=a36de128-74ca-4673-bd29-e9db509f4368
Deleted networks from DNS zone!
To create a non-privileged DNS Zone as a DOMAIN_ADMIN, specify the
--enf-network option. Adding this option attaches the specified network to
the zone in the same step.
> dns create-zone --zone-domain-name=scranton.prod --enf-network=2607:8f80:8080:b::/64 --description=Scranton Factory Floor

Created DNS zone scranton.prod!
+--------------------------------------+---------------+------------------------+------------+---------------------+
| Id                                   | Zone          | Description            | Privileged | Enf Domain          |
+--------------------------------------+---------------+------------------------+------------+---------------------+
| f45aca46-9c03-49f0-bdb9-81bdfdf778c8 | scranton.prod | Scranton Factory Floor | false      | 2607:8f80:8080::/48 |
+--------------------------------------+---------------+------------------------+------------+---------------------+
1 rows in set
Only the description field of a DNS Zone may be updated.
> dns update-zone --zone-id=f45aca46-9c03-49f0-bdb9-81bdfdf778c8 --description=Scranton Warehouse
+--------------------------------------+---------------+--------------------+------------+---------------------+
| Id                                   | Zone          | Description        | Privileged | Enf Domain          |
+--------------------------------------+---------------+--------------------+------------+---------------------+
| f45aca46-9c03-49f0-bdb9-81bdfdf778c8 | scranton.prod | Scranton Warehouse | false      | 2607:8f80:8080::/48 |
+--------------------------------------+---------------+--------------------+------------+---------------------+
1 rows in set
When a zone is no longer needed, it should be deleted. If a field besides the description needs to be updated for a DNS Zone, it must be deleted and created from scratch.
> dns delete-zone --zone-id=f45aca46-9c03-49f0-bdb9-81bdfdf778c8
Deleted DNS Zone with id: f45aca46-9c03-49f0-bdb9-81bdfdf778c8
Once a DNS Zone is created, we can add DNS records that allow us to access an endpoint by name instead of by an IPv6 address. Names are much easier to remember and, therefore, much less error-prone.
For this example, we are using the DNS Zone, scranton.prod and machine name,
server1.
> dns create-record --zone-id=f45aca46-9c03-49f0-bdb9-81bdfdf778c8 --name=server1 --type=AAAA --ttl=30 --value=2607:8f80:8080:b:bd32:eeb9:2085:b8cb

Created new DNS record!
+--------------------------------------+-----------------------+------+--------------------------------------+-----+
| Id                                   | Name                  | Type | Value                                | TTL |
+--------------------------------------+-----------------------+------+--------------------------------------+-----+
| 7cd23179-c2e4-4fb9-8024-8393b10f3125 | server1.scranton.prod | AAAA | 2607:8f80:8080:b:bd32:eeb9:2085:b8cb | 30  |
+--------------------------------------+-----------------------+------+--------------------------------------+-----+
1 rows in set
The --type option is the type of DNS record to create. The types are similar
to DNS record-types on the public internet, but only some are supported. The
supported record types are:
| Type | Description |
|---|---|
| AAAA | This maps a host name to an IPv6 address |
| CNAME | Is an alias from one name to another. |
| TXT | Text record - usually some machine-readable data. See RFC-1464 |
| SRV | Server Locator Record |
| SOA | Start of Authority record - authoritative info about a DNS Zone. |
| NS | Name Server record - delegates a zone to use the provided name server |
The --ttl option, or time to live determines how long a machine should
cache a DNS result. The higher the value, the less load on the DNS Server, but
the longer it will take a machine to realize that a record was updated.
The DNS entry is not yet ready to use – there is no server to respond to requests.
DNS Records cannot be modified – they must be deleted and recreated. If a server is no longer used, the DNS record should be deleted when the server is decommissioned.
> dns delete-record --id=7cd23179-c2e4-4fb9-8024-8393b10f3125
Deleted DNS record!
In the previous two steps, we’ve created a DNS Zone and added a DNS record. The DNS is not yet ready to use because we don’t have a server to respond to a DNS query.
> dns provision-server --network=2607:8f80:8080:b::/64 --description=Scranton DNS

+--------------------------------------+--------------------------------------+-----------------------+--------------+
| Id                                   | IPv6                                 | Network               | Description  |
+--------------------------------------+--------------------------------------+-----------------------+--------------+
| 1f716f4d-d0b6-4d8d-ae05-3a46bb55ae73 | 2607:8f80:8080:b:82b1:406e:2aac:fb29 | 2607:8f80:8080:b::/64 | Scranton DNS |
+--------------------------------------+--------------------------------------+-----------------------+--------------+
1 rows in set
The endpoints that are now going to use the DNS must be configured to use
2607:8f80:8080:b:82b1:406e:2aac:fb29 as the DNS server.
It is possible to configure a DNS Server’s address by adding the --ipv6
option. This could be used to have a consistent DNS Server address on every
network.
> dns provision-server --network=2607:8f80:8080:e::/64 --description=Rockford DNS --ipv6=2607:8f80:8080:e::aaaa
+--------------------------------------+------------------------+-----------------------+--------------+
| Id                                   | IPv6                   | Network               | Description  |
+--------------------------------------+------------------------+-----------------------+--------------+
| f1938b7e-2dc8-42da-93ab-a0b69f0413e7 | 2607:8f80:8080:e::aaaa | 2607:8f80:8080:e::/64 | Rockford DNS |
+--------------------------------------+------------------------+-----------------------+--------------+
1 rows in set
Note that the network must already been associated with at least one DNS zone.
When deleting a server, both the network and DNS Server’s IPv6 address must be specified.
> dns delete-server --ipv6=2607:8f80:8080:e::aaaa --network=2607:8f80:8080:e::/64
Delete DNS server with ipv6 2607:8f80:8080:e::aaaa in 2607:8f80:8080:e::/64!
The ENF uses roles to add & remove privileges from a specific user. A user
may belong to more than one role, and the roles determine the actions that a
user is allowed to perform.
The roles are:
The following tools will need to be installed.
enfcli (for help, see the Getting Started Tutorial)enfcli.enfcli --host demo.xaptum.io --user <[email protected]>
> user send-invite --network=2607:8f80:8080:b::/64 --email=<[email protected]> --name=John Public --role=NETWORK_USER
Example invitation to a DOMAIN_ADMIN role:
> user send-invite --network=2607:8f80:8080:b::/64 --email=<[email protected]> --name=John Public --role=DOMAIN_ADMIN
> user list-invites
> user list-users --network=<2607:8f80:8080:b::/64>
The user to whom the invitation was sent must now respond to the email to create an account.
Following network security best practices, it is often desireable to allow
access to a user for only the time needed to perform a task. For example: an
engineer may need to add a new network for a new facility, but that engineer
does not usually need access to make such changes.
To accomodate this, a user may be deactivated after such tasks are complete.
The following tools will need to be installed.
enfcli (for help, see the Getting Started Tutorial)enfcli.enfcli --host demo.xaptum.io --user <[email protected]>
> user list-users --network=2607:8f80:8080:b::/64
> user deactivate-user --email=<[email protected]>
> user list-users --network=2607:8f80:8080:b::/64
+-----+----------------+-----------------------------+---------------------+----------------------+----------+
| Id  | Name           | Username                    | Domain              | Last Login           | Status   |
+-----+----------------+-----------------------------+---------------------+----------------------+----------+
| 79  | Customer Admin | [email protected]       | 2607:8f80:8080::/48 | 2020-07-02T19:27:37Z | ACTIVE   |
| 80  | John Q Public  | [email protected] | 2607:8f80:8080::/48 | 2020-06-30T21:25:27Z | INACTIVE |
+-----+----------------+-----------------------------+---------------------+----------------------+----------+
Contact us and we’ll get back to you as soon as possible.
Contact Us